IVR Configuration
The Remedy platform provides web services to access the data stored within any form configured within Remedy. This example was accomplished using the HPD_IncidentInterface_WS web service created from the HPD_IncidentInterface form. The details of the SOAP request are described below.
- In this example, the HTTP transport does not use any security and the Remedy username and password are passed as plain text elements in the SOAP Envelope. This is not a recommended configuration for production environments.
- The request body must include the <?xml tag to specify the encoding. If the encoding is not specified, CIC will still send the encoding parameter in the HTTP header, but the value will be blank. Remedy requires the value to be set and will return a HTTP 500 (internal server error) if the encoding is not set.
- The full incident number must be passed in the SOAP request or the request will fail. The caller inputs the numeric portion in the IVR, which is stored in Custom_TicketNumber, and is then prepended with INC_CAL_ to produce a final value, such as INC_CAL_1000010.
- The WSDL may be obtained using the URL configured for the service in the Remedy Developer Studio. For this example, the URL to access the WSDL is http://ec2-54-85-117-2.compute-1.amazonaws.com:8080/arsys/WSDL/public/itsmstack/HPD_IncidentInterface_WS. The requests and responses for this example were generated using SoapUI, a web service testing suite available to download for free from SmartBear Software.
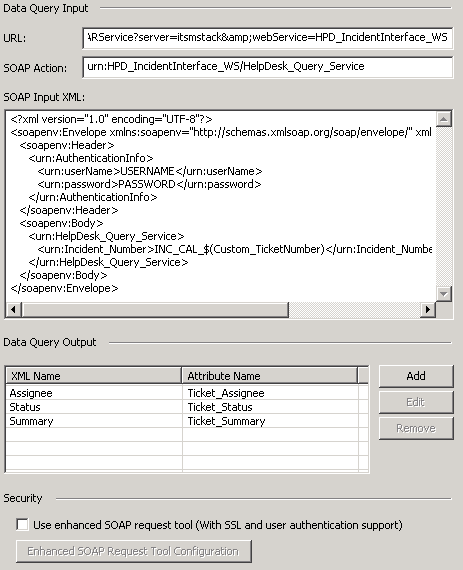
- Attendant Remote Data Query configuration:
- URL (obtained from the WSDL): http://ec2-54-85-117-2.compute-1.amazonaws.com:8080/arsys/services/ARService?server=itsmstack&webService=HPD_IncidentInterface_WS
- SOAP Action: urn:HPD_IncidentInterface_WS/HelpDesk_Query_Service
- As you can see in the sample response below, a multitude of fields are returned from the web service. This data can be used to create feature rich self-service IVR applications in Attendant (no handlers required!). The Remote Data Query Node can be configured to map response values to call attributes to be used later in the IVR and for use in the screen pop.
Example SOAP request body:
1
2
3
4
5
6
7
8
9
10
11
12
13
14
<?xml version="1.0" encoding="UTF-8"?>
<soapenv:Envelope xmlns:soapenv="http://schemas.xmlsoap.org/soap/envelope/" xmlns:urn="urn:HPD_IncidentInterface_WS">
   <soapenv:Header>
      <urn:AuthenticationInfo>
         <urn:userName>USERNAME</urn:userName>
         <urn:password>PASSWORD</urn:password>
      </urn:AuthenticationInfo>
   </soapenv:Header>
   <soapenv:Body>
      <urn:HelpDesk_Query_Service>
         <urn:Incident_Number>INC_CAL_$(Custom_TicketNumber)</urn:Incident_Number>
      </urn:HelpDesk_Query_Service>
   </soapenv:Body>
</soapenv:Envelope>
Example SOAP response body:
1
2
3
4
5
6
7
8
9
10
11
12
13
14
15
16
17
18
19
20
21
22
23
24
25
26
27
28
29
30
31
32
33
34
35
36
37
38
39
40
41
42
43
44
45
46
47
48
49
50
51
52
53
54
55
56
57
58
59
60
61
<soapenv:Envelope xmlns:soapenv="http://schemas.xmlsoap.org/soap/envelope/" xmlns:xsd="http://www.w3.org/2001/XMLSchema" xmlns:xsi="http://www.w3.org/2001/XMLSchema-instance">
   <soapenv:Body>
      <ns0:HelpDesk_Query_ServiceResponse xmlns:ns0="urn:HPD_IncidentInterface_WS">
         <ns0:Assigned_Group>Service Desk</ns0:Assigned_Group>
         <ns0:Assigned_Group_Shift_Name/>
         <ns0:Assigned_Support_Company>Calbro Services</ns0:Assigned_Support_Company>
         <ns0:Assigned_Support_Organization>IT Support</ns0:Assigned_Support_Organization>
         <ns0:Assignee>Francie Stafford</ns0:Assignee>
         <ns0:Categorization_Tier_1>Failure</ns0:Categorization_Tier_1>
         <ns0:Categorization_Tier_2>Functionality</ns0:Categorization_Tier_2>
         <ns0:Categorization_Tier_3>Repair</ns0:Categorization_Tier_3>
         <ns0:City>New York</ns0:City>
         <ns0:Closure_Manufacturer/>
         <ns0:Closure_Product_Category_Tier1/>
         <ns0:Closure_Product_Category_Tier2/>
         <ns0:Closure_Product_Category_Tier3/>
         <ns0:Closure_Product_Model_Version/>
         <ns0:Closure_Product_Name/>
         <ns0:Company>Calbro Services</ns0:Company>
         <ns0:Contact_Company>Calbro Services</ns0:Contact_Company>
         <ns0:Contact_Sensitivity>Standard</ns0:Contact_Sensitivity>
         <ns0:Country>United States</ns0:Country>
         <ns0:Department/>
         <ns0:Summary>Unable to detect USB devices.</ns0:Summary>
         <ns0:Notes/>
         <ns0:First_Name>Joe</ns0:First_Name>
         <ns0:Impact>2-Significant/Large</ns0:Impact>
         <ns0:Last_Name>Unser</ns0:Last_Name>
         <ns0:Manufacturer/>
         <ns0:Middle_Initial/>
         <ns0:Organization>Human Resources</ns0:Organization>
         <ns0:Phone_Number>1 212 5555454 (66)</ns0:Phone_Number>
         <ns0:Priority>High</ns0:Priority>
         <ns0:Priority_Weight>0</ns0:Priority_Weight>
         <ns0:Product_Categorization_Tier_1>Hardware</ns0:Product_Categorization_Tier_1>
         <ns0:Product_Categorization_Tier_2>Processing Unit</ns0:Product_Categorization_Tier_2>
         <ns0:Product_Categorization_Tier_3>Other Type of Processing Unit</ns0:Product_Categorization_Tier_3>
         <ns0:Product_Model_Version/>
         <ns0:Product_Name/>
         <ns0:Region>Americas</ns0:Region>
         <ns0:Reported_Source>Systems Management</ns0:Reported_Source>
         <ns0:Resolution/>
         <ns0:Resolution_Category/>
         <ns0:Resolution_Category_Tier_2/>
         <ns0:Resolution_Category_Tier_3/>
         <ns0:Service_Type>User Service Restoration</ns0:Service_Type>
         <ns0:Site>Headquarters, Building 1.31</ns0:Site>
         <ns0:Site_Group>United States</ns0:Site_Group>
         <ns0:Status>Assigned</ns0:Status>
         <ns0:Status_Reason xsi:nil="true"/>
         <ns0:Urgency>2-High</ns0:Urgency>
         <ns0:VIP>No</ns0:VIP>
         <ns0:ServiceCI/>
         <ns0:ServiceCI_ReconID/>
         <ns0:HPD_CI/>
         <ns0:HPD_CI_ReconID/>
         <ns0:HPD_CI_FormName/>
         <ns0:z1D_CI_FormName/>
      </ns0:HelpDesk_Query_ServiceResponse>
   </soapenv:Body>
</soapenv:Envelope>
Screenshot of Remote Data Query node in Attendant:

Screen Pop Configuration
Configuring the screen pop requires two steps. First, the action must be configured in Interaction Administrator. Second, the screen pop action must be set via a Screen Pop node in Attendant.
Creating the screen pop action
- In Administrator, find the Actions container. It is the ninth item under System Configuration.
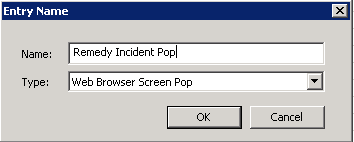
- Right click on the grid on the right side and select New.... Give the action a useful name and set the Type to Web Browser Screen Pop

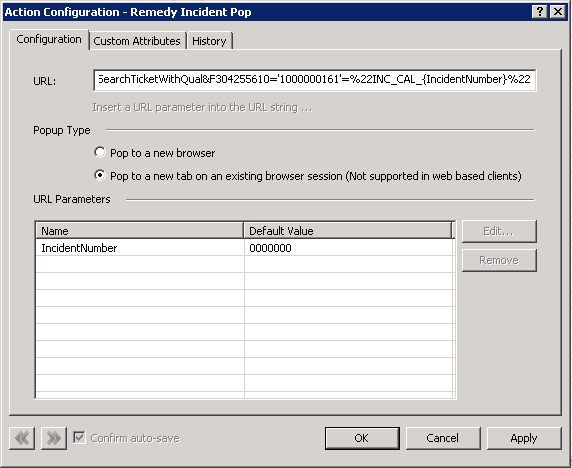
- On the configuration screen, set the URL to http://ec2-54-85-117-2.compute-1.amazonaws.com:8080/arsys/forms/itsmstack/SHR%3ALandingConsole/Default+Administrator+View/?mode=search&F304255500=HPD:Help+Desk&F1000000076=FormOpen&F303647600=SearchTicketWithQual& F304255610='1000000161'=%22INC_CAL_{IncidentNumber}%22
- Change the server name/port to the correct value for your Remedy mid-tier server.
- Change the Remedy instance name (itsmstack in this example) to the correct name of your Remedy instance.
- Click the Insert a URL parameter into the URL string... link to create a new parameter. In the example URL above, the parameter was named IncidentNumber and is represented as {IncidentNumber}. The default value can be set to any value desired, but is set to six zeros in this example. The Override (Attendant) setting must be set to Allow Override so the value can be replaced with the value specified in Attendant (future steps below).
- This is a screenshot of the completed configuration:

Setting the screen pop on the call
- In Attendant, prior to transferring the call to queue, execute a Screen Pop node.
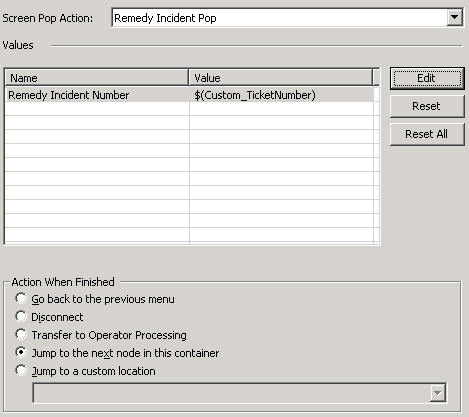
- Set the Screen Pop Action to the action created in Administrator (created in the previous section).
- Edit the parameter value to set it to the call attribute that will contain the numeric portion of the incident number. Note that this must use the attribute replacement notation of $(ATTR_NAME) where ATTR_NAME is the name of the target attribute. This notation instructs CIC to replace the literal string with the value of the attribute. If this is set without the $(...) notation, the literal string will be used instead of the call attribute value.
- Set the Action When Finished setting to continue on to the next node in the call flow.
- This is a screenshot of the completed configuration:
